%20to%20a%20planter%20can%20seem%20daunting%20to%20many,%20but%20it%E2%80%99s%20easier%20than%20you%20think!%0A%0A%0A%0A%0AHere%20at%20REWILD,%20we%20pot%20lots%20of...)
Repotting Your Plant
Transferring your plant from its growers pot (the plastic pot it is often purchased in) to a planter can seem daunting to many, but it’s easier than you think!
Here at REWILD, we pot lots of plants for folks because it’s a free service we offer! Here’s a peek into our process…

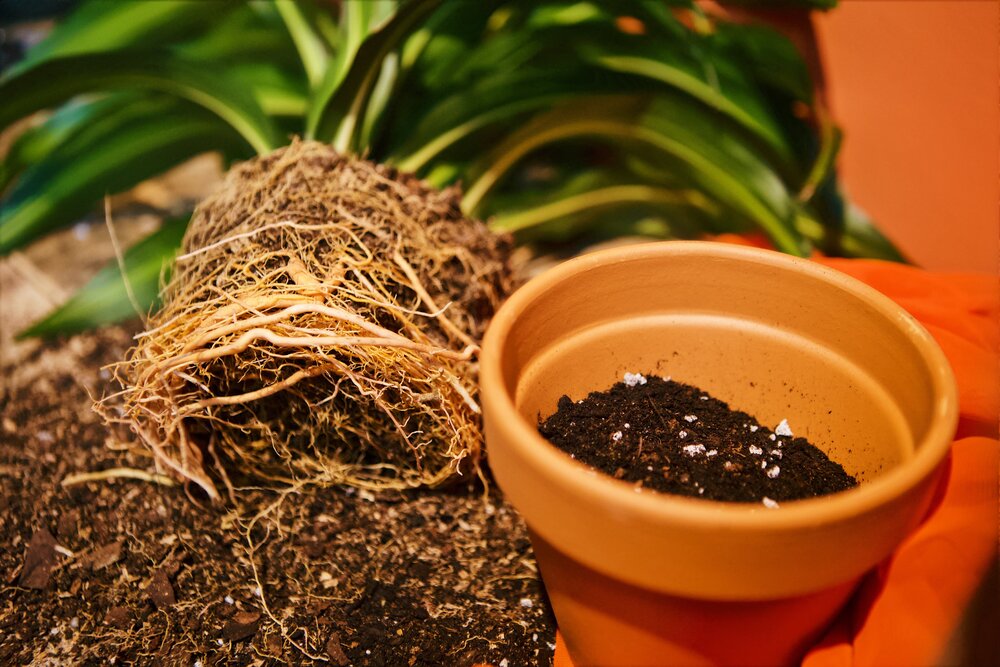
When plants are grown in the nursery, they are kept in what’s known as a growers pot. This is a plastic pot with many holes in the bottom. This pot is designed to house the plant in greenhouse conditions: high moisture, frequent waterings, and therefore a LOT of drainage, hence all the holes in the bottom of the pot! As we saw in the article on When to Water your Plants, it’s important that the roots of a plant don’t sit in water because this can lead to root rot.
While the grower’s pot is certainly sufficient to house a plant in the short term, we recommend potting your plant in a ceramic or terra cotta pot that is 1-2” larger in width and depth. The same goes for plants that are outgrowing their pots over time, either they’ve been in the same pot for a year or two, or you start seeing roots winding around the top of the soil or poking out the bottom. Graduating to an incrementally larger pot will allow the roots to expand so your plant can grow larger (and happier!)
Here’s our process for repotting plants:
-
Start by massaging the plastic pot to loosen up the contents within. This will make it easier to remove the plant.
-
Turn the pot on its side, doing your best to '“dump” the plant into your hand, rather than pulling the plant out. If the plant is not coming out easily, which can often happen when the roots begin to grow through the drainage holes, carefully cut the plastic pot using good scissors, clippers, or a box cutter. We like to start at one of the drainage holes on the bottom edge and cut straight to the top of the pot.
-
Prepare your planter. Ideally, your pot will have a drainage hole and saucer, in which case you can layer a thin layer of stones (we like to use porous lava rocks because they’re lightweight). If your planter does not have a drainage hole, add 1-2” of rocks to the bottom. You’ll want to remember this rock layer if your planter does not have a drainage hole, because when you water your plant, you’ll want to limit the quantity so as not to overflow those stones.
-
Gently loosen the rootball of the plant. When we refer to the rootball, we’re talking about the contents of the planter, the roots and the soil around them. The idea is to slightly break up the shape of the previous pot your plant was in. Occasionally, roots will continue to grow in the same shape as their previous pot and eventually become rootbound (meaning the roots become so tangled and matted that they can no longer grow outwards). We focus on just slightly loosening the bottom and the sides of the rootball of the plant. Sometimes almost all the soil will fall off the roots of the plant, and that is fine. Root structures vary from plant to plant, and this is your opportunity to observe. You can also snip off any blackened or rotted roots that are exposed, which will promote fresh new growth.
-
Place the rootball in the new pot on top of the stones. You’ll want the top of the rootball to sit a few inches below the top of the pot. With one hand, hold the plant in place, and with the other hand, scoop fresh soil into the pot around the rootball. We like to slightly move the plant from side to side and up and down as we add the soil to help the roots settle into its new soil.
-
Fill the pot with soil so that it just covers the top of the rootball. We like to tap the sides of the pot to help settle the soil. Once the soil around the sides and top are fully level, gently compress the soil around the base of the plant. You’ll want your soil to maintain airflow, however, gently compressing will help stabilize the plant until it roots down a bit.
-
Many sources recommend watering your plant at this point, but we recommend waiting a few days to water. Roots are often in a state of shock after repotting, and so they won’t absorb water. Water left sitting in the soil can be harmful to the roots. So give the roots a break for a few days before watering.
Here’s some additional tips to keep in mind:
-
The best time to repot your plant is in the spring and summer, when the plant is leaving its winter dormancy and the roots are expanding.
-
Repotting is dirty business, so lay out a tarp or head outside to do it! That'll make clean up a lot easier.
-
Read up on the type of plant you’re working with to select a soil best suited to its preferred environment in nature. It can also help to study its current soil. Do you see lots of sand? Perlite? Peat moss?
-
Make sure you have some compost in the mix so that your plant gets a fresh dose of nutrients. You’ll notice a spike in its growth in the weeks after you repot it.
-
Be patient. Sometimes your plant experiences some shock from replanting. This can result in a loss of leaves. Don’t panic water when you see this! Stay calm and stick to your watering schedule.
More Articles
During this time of wild uncertainty, there’s one event that has continued without complications: springtime. City living poses unique challenges for many of us - lighting and space being the most ...
Read more
How to fit 91 plants in 557 square feet
In addition to managing pests and remembering to water, creating room for your growing plant family can become a challenge. Today I have 91 houseplants in a 557 square-foot apartment, and now every...
Read more
Leave a comment
This site is protected by hCaptcha and the hCaptcha Privacy Policy and Terms of Service apply.